Sunday, December 23, 2012

Merry Christmas

Merry Christmas! and I'll say Happy New Years too.  I don't do resolutions, but I will try to get more posts going in the new year.

Here's some really quick little projects/gifts that were last minute.  Hot pads and Santa tree ornaments.

Monday, October 8, 2012

Pegasus Completed


Ready for paint
Painted black, because it is black in the story.


Proud carver!  All carving was done by the carver.  None by the "instructor".  All I did was cut out the blanks, and supervise......

All carving was accomplished with a Dremel and a small sanding drum and sleeve.

Wednesday, September 12, 2012

Back To Kids Carving

"Tom, can I carve a Pegasus"? 

We got started this afternoon after school.  Attention spans of kids are not very long.  So we're taking it slow.  We started by roughing in the blank.
We'll round the piece off some more and add detail during the next 15 minute session.  This is what was done in our first 15 minute session.  The wings will be done separate and attached.
We are working out doors with a big box fan to move the dust away from us.
 

Friday, September 7, 2012

Gnome Door Tutorial

From time to time I'll post a tutorial on how I make some items.  This is one of those times.  In order to make a Gnome Door you'll need the following materials and tools:  1/4"x2 7/8"x4 1/4" birch plywood (2),  3/4 x 2 7/8" x 4 1/4" pine (1),  Popsicle sticks (2),  wood axle peg,  stain/wax,  scroll saw, scratch awl/nail,  knife,  drill, glue, compass, and some clamps.

Here's what we're making.
Step 1.  Scribe lines on one of the pieces of 1/4" plywood, 1/4" apart, with a knife, from top to bottom.
2.  Layout and cut arched door frame on the piece of 3/4" pine.  Leave 1/4" sides and top to the door frame.
3.  Place the scribed piece of plywood behind the cut out arched door frame.  Trace the inside of the arched door frame on the scribed piece of plywood and cut this "door" out.
4.  Trace the outside of the arched door frame onto the remaining piece of plywood, and cut.  This is the back.
5.  Assemble the back piece of plywood and the arched door frame, and glue up as one piece.
6.  Mark, cut, and fit door cross members from Popsicle sticks, and glue them onto the door.
7.  Locate where to drill hole for the door knob, and drill to fit wood axle peg.
8.  Glue the door inside the door frame.
9.  Use a nail or an awl to poke small indents where nails might be placed in the door cross members.  Glue axle peg into hole.
10.  Apply wood gel stain, strain, or one off the stain wax combos to the piece, and wipe off, leaving stain in the scribed lines and "nail holes".  Pain the door knob white.
There are several options.  You can carve hinges from the Popsicle sticks, paint and glue on the door.  You can use twigs as a door frame.  You can change the Gnome door shape too.


Tuesday, September 4, 2012

Gnome Doors

I whittle at a diner where I eat breakfast every morning.  When I'm not whittling Santa's I do three inch Gnomes.  It got out of hand!  I now have 24 gnomes standing around.  I decided that they needed some little Gnome doors.  These will be part of my stuff at some shows coming up.

Saturday, August 25, 2012

Power Carving With Kids

Teaching carving with a rotary tool is fun and the results are quite amazing.  As this photo clearly shows, power carving can be be learned by a 10 year olds  The only problem encountered was the finishing of the cow and the calves.  This 10 year old was determined to paint the animals white and green.  She said that they were special breeds from Greenland.  The finish is a wee bit goofy, but the carving is right on..

Thursday, August 16, 2012

Guardian of the Chickens

The girls next door are raising chickens.  Chickens for eggs - not eating!  Heaven forbid!  And what with the varmints in the area, they need some extra protection.  What better protection than a guardian Gnome.

Monday, August 13, 2012

Voices in the Night!

Can it be possible?   Last night, I heard voices.  I think my Featherweight was speaking.  I am sure I heard a voice saying that it was about time to get some fabric out and make something that I could quilt.  Then this morning my wife asked me to consider making some new place mats for the new kitchen.  Now I'm not thinking conspiracy, but something is sure going on.

Friday, August 3, 2012

Large Ark minus one Deck

My way of doing a rain dance.  Removed one deck to bring the ark into more proper balance.  The Gnomes wanted a cruise too...

Saturday, July 7, 2012

BIG Noah's Ark

I decided that I needed a large Noah's Ark for a central display for some carving shows and some sales events.  Doing these arks is therapeutic for me.  Carving the pairs of animals is also fun and a good way for me to do a whole bunch of smaller carvings.  Still have lots of detail to complete.

Monday, July 2, 2012

Shop Transformation!

The transformation of my wood shop to a 3/4 quilting work shop is on hold for a while.  The main focus of the "new" area was to be my daughters long arm quilting machine.  The problem is that the machine is in southern California, and I'm in central Ohio.  Had planned on driving out for a visit this summer, but was reminded that I will want to go to California next spring for my Granddaughters graduation.  So, will wait till next spring.....

On the good side, I can put off cleaning the shop for a while longer....

Monday, June 4, 2012

Table Saws and Quilting!

I'll be posting up a whole bunch about my latest adventure.  This adventure involves transforming my wood shop into a quilting shop.  Not a quilting store, but a place for cutting, piecing, assembling, and quilting the quilt(s).  I'll be keeping the table saw and a scroll saw for Noah's Arks.  Plus I'll keep the carving area in one corner.
My wood shop is attached to the back of the garage, which is attached to the house.  It's large with lots of windows and french doors opening on to a patio.  I have used the shop to design, build, and finish large cabinets.  By large, I mean 8 feet tall, by 4 feet wide.  These I would sell to folks for placement in their two story great rooms.  However, of late, the weight of these pieces as well as my advancing age has conspired against me.  That's code for I'm not as strong as I used to be.  That's one reason for transforming the wood shop to a quilting shop.  The other reason is that my daughter has a long arm quilting machine that she is giving me.

Thursday, May 17, 2012

Quilt Class Raffle Quilt

The quilt class that I co-teach makes several group quilts each class cycle.  These group quilts are raffled off to benefit the Senior Center.  This is my classes latest raffle quilt.  It's a king size.

Wednesday, May 16, 2012

New "Machine"


This gem is complete.  Even has a bobbin case and drive belt.  An original manual was in one of the drawers, but is pretty torn up.  Before I refinish the cabinet I'll clean the machine and try to do some stitching.  It's a NEW HOME.  Don't know how old, but I'd say it's older than I am anyway.  I am planning on using the machine to quilt smaller quilt tops.

Monday, May 7, 2012

Power Carving With Kids

 Kids like to get things done and see the results fast.  This some times presents a problem when trying to learn to use a knife.

Here's my answer.  This is power carving with a low rpm hand held drum sander.  A good leather glove on the hand holding the wood and a 3/8 inch sanding drum chucked up and we're off to the races.
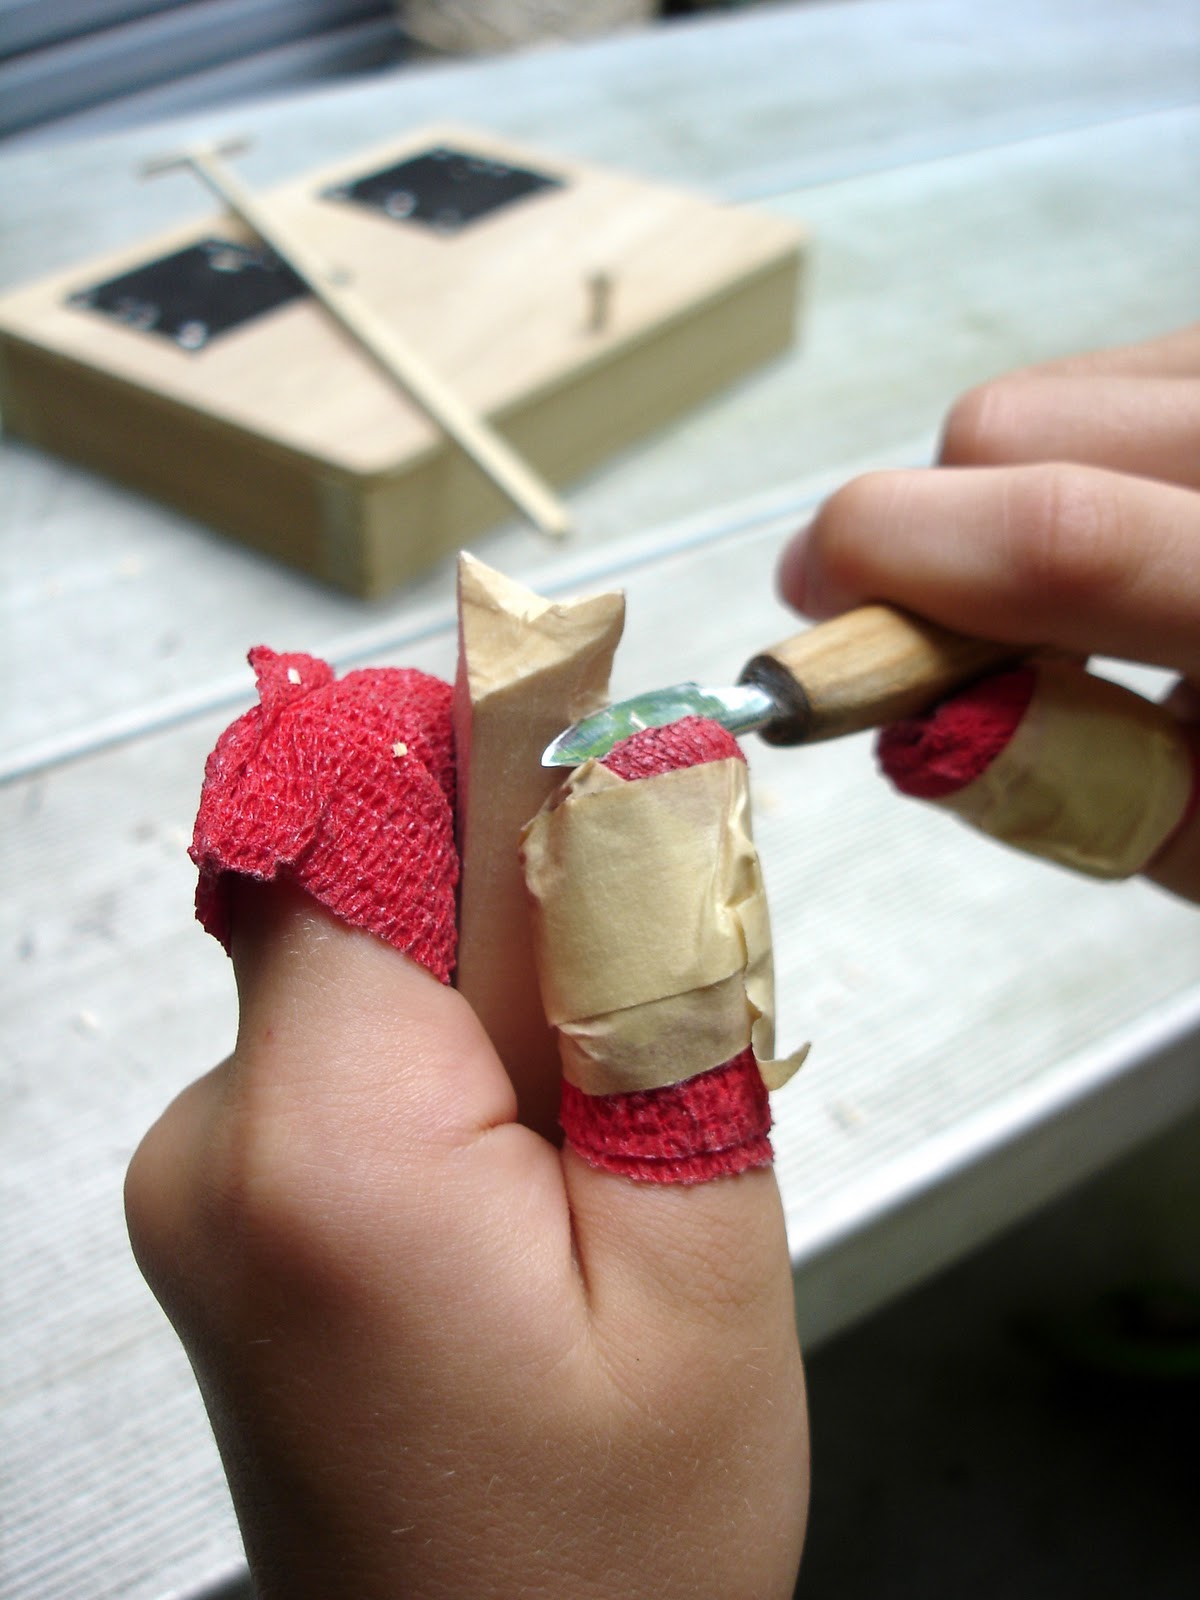
The first project was the cow.  The Cheetah's were the second.  I provided the blank, and carved right along with my "student".  I'd make a "cut" in my piece, and she would make the same cut in her piece.
All in all, a very successful session. 

Wednesday, March 28, 2012

Little Civil War Dude!

Here's a fun little project.  Starts out with a pattern.  Next the pattern is traced onto a 3/4 x 3 inch piece of Basswood, and the blank cut out.  Then it's roughed in with a pocket knife.  Finally the detail is done and the finish applied.

Tuesday, January 31, 2012

Leprechaun's

Thought he needed a little brother.

Thursday, January 26, 2012

A Break From Eyes

It's nearly that time in March.....A quick little whittling.  2 1/2 inches tall...

Tuesday, January 17, 2012

Progress

 Notice the eyes in this first photo.  They are painted on, not carved.  Notice also the eye area.  The top of the eye area (bottom of the brow) is carved at right angles to the plane of the face.  The area of the actual eye ball is flat.  This is what I am attempting to move away from.  I need to have an eye that is carved, not painted.   I also want to do all the carving with a pocket knife.
This photo is where I am today.  The eye is carved.  As soon as I practice this carving technique, and can achieve consistent results, I'll move on to carving smaller eyes.  My goal is to be able to carve eyes that are about half this size.

Notice the eye area in which I carved this eye.  The top of the eye area/bottom on the brow no longer is carved at right angles to the plane of the face.  It is angled so that I can carve the eye lid, and have more room to carve a rounded eyeball.

Thursday, January 12, 2012

Carvings Realistic Eyes

The question of the day:  CAN AN OLD DOG LEARN NEW TRICKS?
And the jury is still out on this question as it relates to me learning to carve realistic eyes.
Here's the problem.  This Ol' dog has spent six years whittling.  When I started someone told me that I need to practice, practice, practice.  This I took to heart,  This might have been the only time in my life that I actually followed instructions.  I started carving faces, Santa faces.  I carved lots of them.  I practiced, practiced, and practiced carving faces.  I got it down so that I could carve them in no time at all.  I've carved at least two Santa pins every day for the past several years.  The eyes on these faces were an after thought, and were mainly half carved and then painted.  Or they were left squinting.  I have just learned that to carve realistic eyes I must alter the way that I roughed out the eye area.  This means relearning how to rough out the eye area.  I have to "unlearn" my old methods, before I can learn the new methods.  There is an old saying................"we cannot plant new crops without first uprooting the old roots and giving the new seeds a chance, we need to unlearn before we can learn anew".  Unlearning is the key. How then do we unlearn our patterns and develop new patterns?

You see my problem?

Tuesday, January 10, 2012

Ready To Learn - Eyes!

I've prepared several faces minus the eyes, in preparation for learning to carve eyes.  I'm thinking this is a lot better than learning to carve eyes on the corner or flat side of wood.   By preparing these faces prior to the actual eye practice, I'm hoping to maximize my learning experience.

Monday, January 9, 2012

Carving Realistic Eyes! A New Start!

Carving small realistic eyes is a challenge, especially when using just a knife; a pocket knife at that.  But that is what I will attempt to do.  I hope you join me in my quest.


Maybe if we're real good and real lucky this will be the result.  I'd really be happy if they were half as well carved, as this example by Mark Akers.  The main problem is, how much detail must I give up to carve the eyes real small?

Sunday, January 8, 2012

Update - Flower Girls

Thought it was time for an update.  Some remember the ongoing events that I posted, concerning my neighbors (Flower Girls), and the Gnomes.  I haven't been posting anything about Gnomey and the girls for many moons.  As the girls got older I came to think that they no longer believed, and that they were kinda going along just "for me".  You know, kids do grow up.  But every now and then The girls say or do something that leads me to believe that there might be a small part of them that still believe in the Gnomes.  Maybe we'll have to contrive a test of sorts.
Mean while I started teaching the girls to carve.


Thursday, January 5, 2012

Summer Quilt Assembled.

That's a queen size bed the top is on.  Now for a flannel back and some quilting.

Wednesday, January 4, 2012

All Failed The Test!

I either included a test in the previous postings about the summer quilt, to see how many would catch the mistake, or more likely I made a bonehead mistake.  I'll let you all figger out which.  The dimensions of the larger white squares are not correctly posted.  They were posted as 10" x 10".  And if you peeked, you'd know that they were also cut at 10" x 10".  These white squares must alternate with the pieced squares.  What size are the pieced squares?  Well the color was pieced from five 2 1/2" strips.  After the five strips were sewn with a 1/4" seam they measure 10 1/2".  Thus one can easily see that they will not match up with 10" white squares.

My next quilt will use 10" white squares......

Sunday, January 1, 2012

"Sweatshop" Quilt Assembly Station

I think this work station is the most efficient - at least for me.  With this setup I don't have to get up from my chair.  All the quilt pieces are at the ready on the left and at the top.  Seams can be pressed at the right.  What you can see in the top right, is the OTT LITE, which helps my tired ol' eyes see what I'm doing.  Got everything I need within reach.